Prática 03 - Preparando ambiente Yocto Project
Note
Diretório de trabalho: ~/treinamento/yp
Baixando Poky
Basicamente para começar a trabalhar com Yocto Project, precisamos clonar o repositório do projeto Poky que contém todas as ferramentas.
mkdir -p ~/treinamento/yp

cd ~/treinamento/yp

git clone -b scarthgap git://git.yoctoproject.org/poky.git
Acessando o diretório poky e listando o conteúdo:
Saída esperada:
drwxrwxr-x  6 b2open b2open   300 May 01 12:26 bitbake
drwxrwxr-x  4 b2open b2open    80 May 01 12:26 contrib
drwxrwxr-x 21 b2open b2open   740 May 01 12:26 documentation
-rw-rw-r--  1 b2open b2open   834 May 01 12:26 LICENSE
-rw-rw-r--  1 b2open b2open 15394 May 01 12:26 LICENSE.GPL-2.0-only
-rw-rw-r--  1 b2open b2open  1286 May 01 12:26 LICENSE.MIT
-rw-rw-r--  1 b2open b2open  2186 May 01 12:26 MAINTAINERS.md
-rw-rw-r--  1 b2open b2open   244 May 01 12:26 MEMORIAM
drwxrwxr-x 21 b2open b2open   460 May 01 12:26 meta
drwxrwxr-x  5 b2open b2open   120 May 01 12:26 meta-poky
drwxrwxr-x 10 b2open b2open   220 May 01 12:26 meta-selftest
drwxrwxr-x  7 b2open b2open   160 May 01 12:26 meta-skeleton
drwxrwxr-x  8 b2open b2open   180 May 01 12:26 meta-yocto-bsp
-rwxrwxr-x  1 b2open b2open  1488 May 01 12:26 oe-init-build-env
lrwxrwxrwx  1 b2open b2open    33 May 01 12:26 README.hardware.md -> meta-yocto-bsp/README.hardware.md
lrwxrwxrwx  1 b2open b2open    14 May 01 12:26 README.md -> README.poky.md
-rw-rw-r--  1 b2open b2open   998 May 01 12:26 README.OE-Core.md
lrwxrwxrwx  1 b2open b2open    24 May 01 12:26 README.poky.md -> meta-poky/README.poky.md
-rw-rw-r--  1 b2open b2open   529 May 01 12:26 README.qemu.md
drwxrwxr-x 11 b2open b2open  1860 May 01 12:26 scripts
-rw-rw-r--  1 b2open b2open  1064 May 01 12:26 SECURITY.md
Criando o primeiro projeto
Saída esperada:
You had no conf/local.conf file. This configuration file has therefore been
created for you from /tmp/poky/meta-poky/conf/templates/default/local.conf.sample
You may wish to edit it to, for example, select a different MACHINE (target
hardware).

You had no conf/bblayers.conf file. This configuration file has therefore been
created for you from /tmp/poky/meta-poky/conf/templates/default/bblayers.conf.sample
To add additional metadata layers into your configuration please add entries
to conf/bblayers.conf.

The Yocto Project has extensive documentation about OE including a reference
manual which can be found at:
    https://docs.yoctoproject.org

For more information about OpenEmbedded see the website:
    https://www.openembedded.org/

This is the default build configuration for the Poky reference distribution.

### Shell environment set up for builds. ###

You can now run 'bitbake <target>'

Common targets are:
    core-image-minimal
    core-image-full-cmdline
    core-image-sato
    core-image-weston
    meta-toolchain
    meta-ide-support

You can also run generated qemu images with a command like 'runqemu qemux86-64'.

Other commonly useful commands are:
 - 'devtool' and 'recipetool' handle common recipe tasks
 - 'bitbake-layers' handles common layer tasks
 - 'oe-pkgdata-util' handles common target package tasks
You had no /tmp/poky/.vscode configuration.
These configuration files have therefore been created for you.
Executando o primeiro build
Utilizando bitbake execute o comando abaixo para iniciar a construção de um Sistema Linux Embarcado, por padrão, qemu-x86:
Antes de executar o comando bitbake é uma boa prática configurar limites no hardware de build para não ocorrer travamentos, Configurando Limites para Build com Bitbake
Acessando os arquivos gerados
O resultado da construção é a geração dos arquivos Bootloaderk, Kernel, RootFS, Device-Tree entre outros arquivos como de Instalaçao e Firmwares. Acesse o diretorio tmp/deploy/images/qemux86-64:
Listando o conteudo do diretorio:
Resultado:
total 255196
lrwxrwxrwx 2 b2open b2open        75 May 23 19:00 bzImage -> bzImage--6.6.92+git0+8e66f449e4_6032c9c1ac-r0-qemux86-64-20250523210145.bin
-rw-r--r-- 2 b2open b2open  12338176 May 23 19:00 bzImage--6.6.92+git0+8e66f449e4_6032c9c1ac-r0-qemux86-64-20250523210145.bin
lrwxrwxrwx 2 b2open b2open        75 May 23 19:00 bzImage-qemux86-64.bin -> bzImage--6.6.92+git0+8e66f449e4_6032c9c1ac-r0-qemux86-64-20250523210145.bin
-rw-r--r-- 1 b2open b2open  38817792 May 25 15:04 core-image-minimal-qemux86-64.rootfs-20250525175826.ext4
-rw-r--r-- 1 b2open b2open      1242 May 25 15:00 core-image-minimal-qemux86-64.rootfs-20250525175826.manifest
-rw-r--r-- 1 b2open b2open      1637 May 25 15:01 core-image-minimal-qemux86-64.rootfs-20250525175826.qemuboot.conf
-rw-r--r-- 1 b2open b2open    156137 May 25 15:01 core-image-minimal-qemux86-64.rootfs-20250525175826.spdx.tar.zst
-rw-r--r-- 1 b2open b2open  18045540 May 25 15:01 core-image-minimal-qemux86-64.rootfs-20250525175826.tar.bz2
-rw-r--r-- 1 b2open b2open    214400 May 25 15:00 core-image-minimal-qemux86-64.rootfs-20250525175826.testdata.json
lrwxrwxrwx 1 b2open b2open        56 May 25 15:01 core-image-minimal-qemux86-64.rootfs.ext4 -> core-image-minimal-qemux86-64.rootfs-20250525175826.ext4
lrwxrwxrwx 1 b2open b2open        60 May 25 15:00 core-image-minimal-qemux86-64.rootfs.manifest -> core-image-minimal-qemux86-64.rootfs-20250525175826.manifest
lrwxrwxrwx 1 b2open b2open        65 May 25 15:01 core-image-minimal-qemux86-64.rootfs.qemuboot.conf -> core-image-minimal-qemux86-64.rootfs-20250525175826.qemuboot.conf
lrwxrwxrwx 1 b2open b2open        64 May 25 15:01 core-image-minimal-qemux86-64.rootfs.spdx.tar.zst -> core-image-minimal-qemux86-64.rootfs-20250525175826.spdx.tar.zst
lrwxrwxrwx 1 b2open b2open        59 May 25 15:01 core-image-minimal-qemux86-64.rootfs.tar.bz2 -> core-image-minimal-qemux86-64.rootfs-20250525175826.tar.bz2
lrwxrwxrwx 1 b2open b2open        65 May 25 15:00 core-image-minimal-qemux86-64.rootfs.testdata.json -> core-image-minimal-qemux86-64.rootfs-20250525175826.testdata.json
-rw-r--r-- 2 b2open b2open 198506252 May 23 19:00 modules--6.6.92+git0+8e66f449e4_6032c9c1ac-r0-qemux86-64-20250523210145.tgz
lrwxrwxrwx 2 b2open b2open        75 May 23 19:00 modules-qemux86-64.tgz -> modules--6.6.92+git0+8e66f449e4_6032c9c1ac-r0-qemux86-64-20250523210145.tgz
Executando a imagem gerada com runqemu
A ferramenta runqemu é um script que permite executar a imagem gerada no Yocto Project com bitbake utilizando QEMU, as possiveis configurações para MACHINE e utilizar QEMU são:
#MACHINE ?= "qemuarm"
#MACHINE ?= "qemuarm64"
#MACHINE ?= "qemumips"
#MACHINE ?= "qemumips64"
#MACHINE ?= "qemuppc"
#MACHINE ?= "qemux86"
MACHINE ?= "qemux86-64"
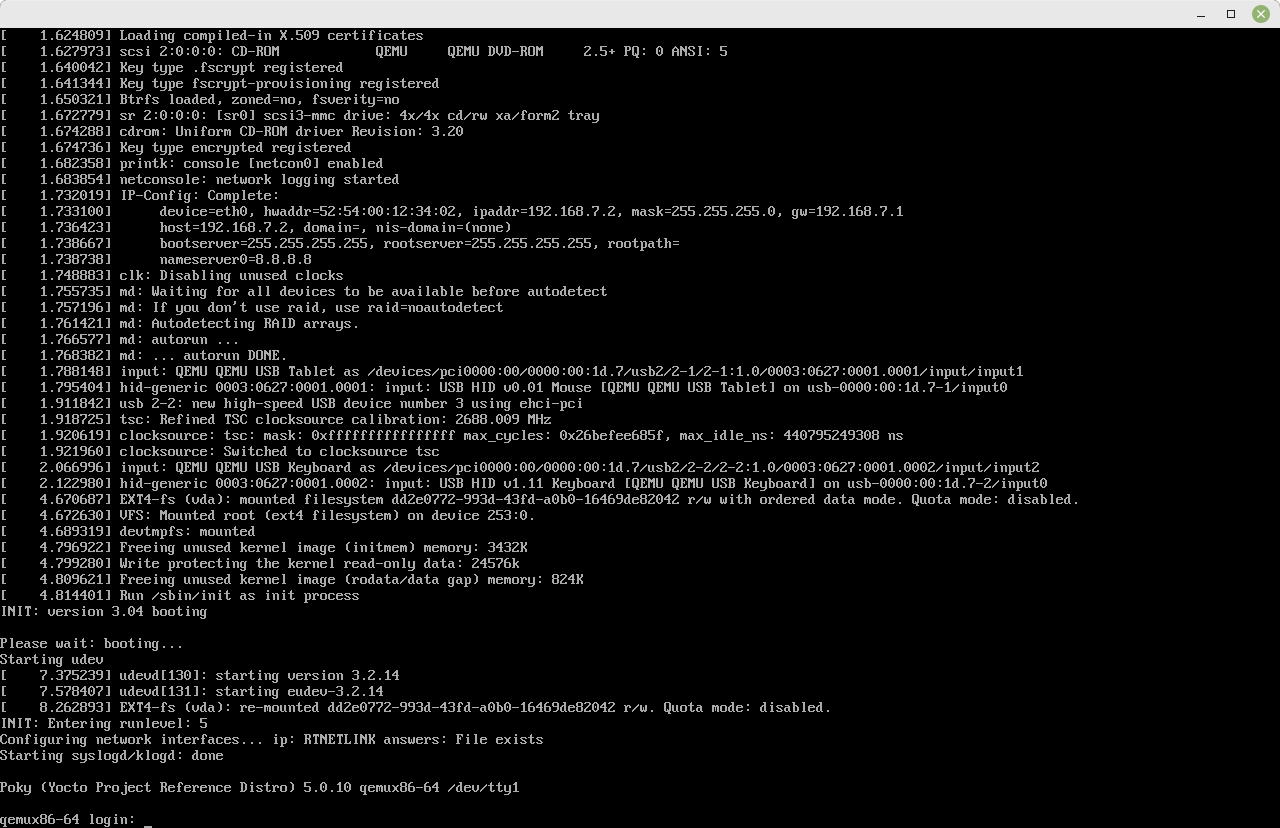
O padrão é qemux86-64, executando o runqemu com o comando abaixo:
Abaixo o exemplo do Terminal Grafico que deverá abrir: